Charging
Part 3
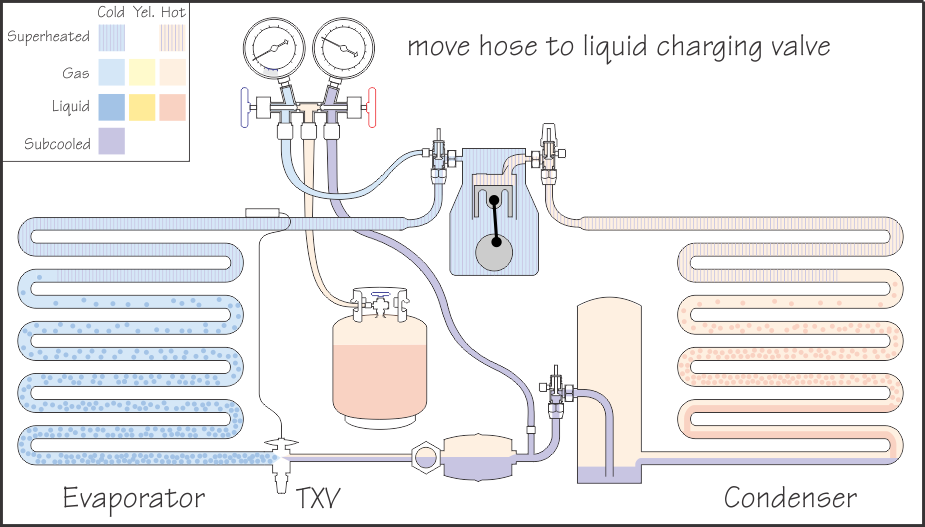
A liquid charging valve is an access valve which is installed downstream of the King Valve. This location allows for some fancy maneuvering. Note in the diagram below that the high side hose has been removed from the DSV and that the DSV has been back seated and capped off as it is no longer needed. The high side hose has been relocated to the liquid charging valve and is sensing high side pressure from that location instead. In this case the liquid charging valve is a Schraeder Valve but it could also have been another service valve. The pressure is still the same other than perhaps some tiny bit of pressure drop from frictional losses through the condenser. When you measure high side pressure from the DSV it is called True Head Pressure. It can still be called Head Pressure as measured from anywhere on the high side of the system but the distinction of being called True Head Pressure is reserved for measurements from the DSV location.
We are looking for a way to charge with liquid refrigerant rather than vapour and the first problem to overcome is getting liquid out of the jug. Refer to the diagram below and click Button 2 for the solution. So now we have access to liquid and we have our hose hooked up to a place where it would be fine to introduce it but there is another problem. The pressure in the high side of the system may be equal to or higher than the pressure in the jug so we might not get any flow. But what if we pump down the low side...click Button 3 to front seat the King Valve. The low side empties. Note that the Liquid charging Valve is now part of the low side. The pressure reading on the high side gauge is indicating the same low pressure as the low side gauge. We now have a pressure differential between the liquid in the jug and the liquid line where it is safe to introduce liquid. Press Button 4 to start charging liquid. Notice that the sight glass starts to show liquid, the suction gauge pressure increases and the high side gauge reflects the pressure from the jug, not from the high side of the system. Press 5 to continue charging. Are you noticing that the amount of area being used for superheating is decreasing? (An increasing amount of the evaporator is being used for evaporation so there is less room left over for excessive superheating) We may achieve a fuller Sight Glass but this is not a reflection of system operating conditions. We do not have a loop, we have a front seated King Valve. All the refrigerant you are adding is merely being relocated into the isolated high side. First it changes to a gas in the evaporator, then it is in a form to be safely drawn into the compressor and finally it is condensed in the condenser and ends up in the receiver which starts to fill up.
With the system in the present configuration there is no way of telling us whether we have yet added sufficient refrigerant. We should be monitoring the weight of the jug so we know how much refrigerant has been added and periodically closing the red hand wheel and opening the King Valve to see how things are progressing. Be cautious not to overcharge the system using this method. When you get close to being complete it can be a wise decision to complete charging by the vapour charging method so it is not so easy to overshoot the correct charge.
If you happen to have a refrigerant jug with 2 valves then there is no need to invert the jug to get liquid. Press 6 to see a dual valve jug. The red valve controls flow through a dip tube which is submerged into the liquid level.

We have gone over several techniques about manipulating a system through use of it's valves and charging refrigerant. There is of course a great deal more to diagnosing and understanding the refrigerant side of systems than we have touched on so far. To do that we must start dealing with specific values and that is what we shall do next.

